
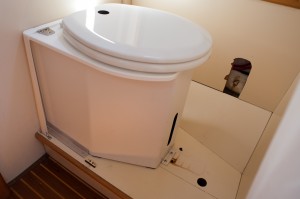
C-Head Composting Toilet installed in Czardas’ head compartment.
The new C-Head toilet is open for business! Installation was simple, though figuring out how to install the toilet took some doing. The base is larger than the previous Jabsco marine toilet and the raised platform inside the head compartment caused some awkwardness. But once a plan came together the execution was easy.
The C-head replaces an Electra Scan system. That system included a typical marine toilet, thru-hulls for water intake and pumping out effluent, a waste processer, electronic controllers, electrical cables, and hoses. The entire system was removed and the thru-hulls were glassed in a couple months ago, resulting instantly in a cleaner smelling boat.
The C-Head and other similar composting toilets qualify as a portable toilet. The only installation requirement is that the toilet be secured so that it won’t move or fall no matter how the boat heels or pitches. The C-Head website suggests blocking the base so the toilet can’t slide around and then lashing it down to the floor by attaching cleats to the toilet’s base. I originally planned to do exactly that but the shape of the platform in the head compartment ruled out the cleats idea.
For blocking the base, I used 1” aluminum angle bracket. Aluminum is easy to cut with a Multimaster and can be drilled using carbide bits. The brackets on each side of the base are about nine inches and the one in front is about four inches. The holes accommodate #10 fasteners. I thru-bolted two brackets. But for the bracket near the front edge of the platform I had to use self-tapping (wood) screws because they were positioned over the wall of the platform.
Now is a good time to mention one of the big lessons learned from this project. Stainless steel fasteners are expensive and until now I have purchased each individual screw, washer and nut as needed for each project. But every change of installation plan—from cleats to eyes and thru-bolted brackets to wood screws—required another trip to the store for hardware. I finally got wise and purchased the “Ultimate Screw Kit” from West Marine. The boat now counts a wide variety of spare fasteners as standard equipment.
Using cleats to tie down the toilet wasn’t going to work because of the orientation and the shape of the platform. Instead, I attached webbing eye straps to the platform on both sides of the toilet. To prepare the one inch webbing, I melted the ends to prevent fraying and sewed one end onto a buckle using heavy duty thread. The other end loops through an eye, over the back of the toilet, through the other eye, and then gets looped into the second piece of the buckle. After snapping together the ends of the buckle and cinching the strap the toilet is held in place very securely. Removal is as easy as releasing the buckle and lifting out the toilet.