 I have been a flip-flopper. But it’s not my fault. For months I have been trying to gather the knowledge required to replace seacocks and add backing plates. Oddly enough the biggest difficulty has been too much information and too many different ways of doing things. As things stand now, the plan has come full circle. I will make backing plates from a fiberglass board. The general procedure for creating the board is described in detail here.
Today I started fabricating the fiberglass board in my garage. It’s my first time working with fiberglass and resin. I am certain there are cheaper and easier ways to obtain a laminate board. But making my own gives me the chance to get my hands dirty (figuratively speaking) in a non-stressful manner, away from the boat.
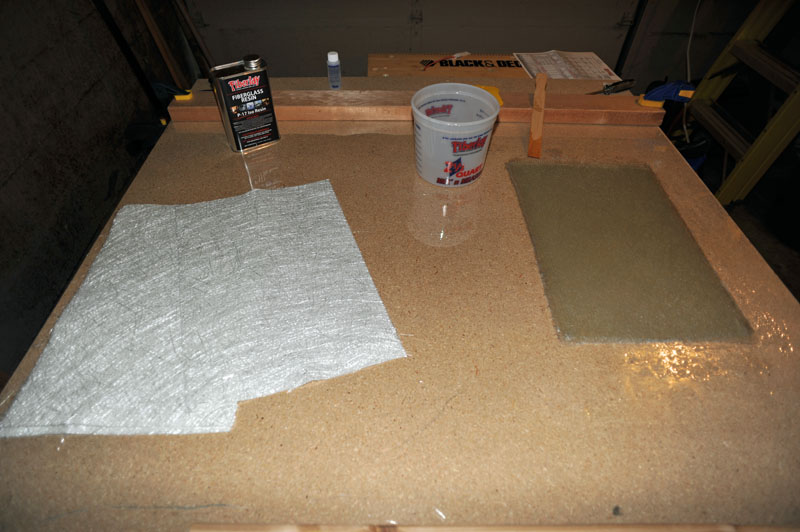 There are several variations on the exact materials to use. In the end I went with the recipe given by the salesman at the local fiberglass supply store: iso polyester resin and biaxial fiberglass cloth. The salesman estimated nine or ten layers would yield the desired 5/8″ thick board. The cloth came in 12″ width and I cut pieces 18″ long. The resulting board should easily yield six backing plates. Today I laminated the first four layers of fiberglass with six more ready to add on tomorrow.
What have I learned so far? First, resin doesn’t flow easily like paint. The brush deposits the resin and then a squeegee is used to spread the resin and work it down into the fiberglass. Second, it took more resin than I expected to saturate each layer of fiberglass. Third, the toxic fumes are intense. I only noticed after I finished and removed the respirator. Despite the open garage door the smell had made its way into the house. When I add more layers tomorrow I’ll keep a fan blowing the entire time. Fourth, fiberglass threads end up everywhere. Before applying resin dry wisps sloughed off the edges of my cut fiberglass rectangles. More surprising, a few fiberglass threads dislodged while squeegeeing. It doesn’t seem to matter but the entire process is messier than anticipated and a fair amount of resin-fiberglass sludge ends up around the edges of the work piece.
Once the board is finished, I’ll cut out discs about 4″ in diameter. Fortunately my neighbor, a professional cabinet maker, offered to do the cutting using his commercial shop tools. We’ll use a hole saw in a drill press to cut a hole in the middle of the disc for the thru hull to pass through. Also we’ll use the drill press to tap holes for the bolts that will secure the seacock to the plate.
We’ll finish one backing plate which I’ll use for practice. I’ll fashion some scrap wood to simulate the boat hull, with a hole for the thru hull, and the surface shaped to resemble the curvature of the hull’s interior. I’ll epoxy the backing plate to the wood, install the thru hull with 3M 4200 or 5200 sealant, and bolt in the seacock. All this means that when I finally go to install backing plates and seacocks in the boat, the process will be familiar and the results perhaps a bit better.